WFH Better: Exercises and stretches that address “tech neck”, shoulder stiffness, and headaches

Over a year into the COVID-19 pandemic and with almost 60% of Americans working from home (and gyms closed until recently), more than ever, many of us are feeling the aches and pains of slouching over makeshift workstations, using sofas, stools, and dining tables, perhaps rotating between a few different setups, hunched over laptop screens. As the WFH lifestyle has become the new normal, working from these awkward positions for long periods of time has not only become habitual, but the repetititive stress might also be causing chronic muscle or joint tightness, cramps, spasms, or even pain. We’ve all heard that being sedentary is harmful for health, but combined with the dramatic decline in physical activity and social gatherings due to the pandemic, as well as an incline in stress levels (chronic stress has been shown to increase physical pain), we have all been dealing with an unprecedented and tremendous impact on our physical and mental well-being.

As a result of this more home-bound, sedentary lifestyle, and routinely working from home on less-than- ideal workstation setups, you may be experiencing any of the following:

  • Headaches

  • Neck aches

  • Eye strain

  • Jaw aches

  • Wrist pain

  • Low back pain

  • Poor posture

  • Tight hips

  • Leg cramps

  • Foot soreness or heel pain

  • Stiff shoulders

  • Chest tightness

If you’re in the Bay Area, you might have started going to the gym (now at the yellow tier, San Francisco county has recently allowed gym capacity to increase from 25 to 50%). But whether you’re getting into the gym regularly or not, there are a few stretches, exercises, and self-massage techniques that can be applied intermittently throughout the day, to break up long periods of time sitting, or in the mornings and evenings, to support healthy blood circulation, joint mobility, flexibility, and good posture. And of course, these can easily be done in the gym too.

In the following WFH series of articles, we’re going to share some tips on what you can do to alleviate the physical aches and pains that you might be dealing with. In this week’s post (part one), we’re going to cover 8 areas of exercises, stretches, self-massage, and tips to address “tech neck” or “text neck”, shoulder stiffness, headaches, eye strain, jaw aches, and wrist pain.

(1) Head and neck stretches

You might have noticed that you are constantly bending your head forward to get a good view of your laptop or phone screen, causing some neck tension, headaches, eye strain, or general stiffness. “Tech neck” seems like a minor inconvenience, but it’s important to note that even with a slight forward bend of your head at 15 degrees, this position adds 27 lbs of extra weight to your cervical spine! And a 60 degree forward bend adds 60 lbs of weight - according to a study published in Surgical Technology International. What may start as acute pain, headaches, or dizziness, may worsen to radiating pain, reduced lung capacity, and spinal degeneration.

Try this series for the neck:

Tilts - While seated, gently tilt your head forward, tucking your chin to your chest, and optionally, clasping your hands behind your head to provide some extra pressure. Hold while taking a few deep breaths, approximately 20 seconds. Now gently tilt your head backwards, while keeping the jaw closed, to stretch the vocal chords, taking a few deep breaths.

You can also do a side tilt on each side, gently using your hand to pull diagonally up while relaxing the opposite shoulder to create length in the neck, taking deep breaths and holding for about 20 seconds each.

Rotations and circles - Turn your head to the left, as far as possible, then turn to the right, as far as possible. You may also want to slowly practice some circles, going first clockwise for 5-8 reps, then counterclockwise.

Tennis ball or lacrosse ball self-massage - Using a ball can assist in releasing trigger points or knots in the muscle. You can simply grab the ball and apply pressure on your own or use a wall to assist (these ones do the job well; you can also opt for a ball like this one). When you find a muscle knot, hold and place pressure while taking 2-3 deep breaths (visualize the air going into the muscle and lengthening it), then roll past the area where the knot was. Roll along the length of the muscle, from the base of the neck to your shoulder, relieving any trigger points along the way.

In addition to these stretches and self-massage maneuvers, it may help to position your device so that it is more readily viewed with a neutral neck position.

If you’re dealing with eye strain from prolonged computer use, it may subside relatively easily if you take a break to look away, and blink the eyes frequently to refresh them. There is a commonly recommended 20-20-20 rule that states that every 20 minutes, you should look at an object 20 feet away for 20 seconds. Another noteworthy tip is to make sure the room is bright enough - your screen shouldn’t be much brighter than your surroundings.

(2) Jaw stretches

If you’ve noticed that you’ve been clenching your jaw or grinding your teeth, it may be your body’s way of releasing tension from day-to-day stress. According to a dentist based in Ohio, the energy produced by the body in response to stress - to allow for a fight-or-flight response - must be released in some way, by some type of activity, and for some people, this tension is released by clenching or grinding their teeth.

Healthline has a few suggestions to relieve jaw tension:

Goldfish stretch - With your tongue putting pressure on the roof of your mouth, open and close your mouth slowly, as wide as you can.
Smile stretch - Smile widely while slowly opening and closing your jaw
Massage the jaw muscles near your ears in a circular motion as you open your jaw

In addition, you might consider using a mouth guard (here’s an example).

(3) Shoulder and chest stretches

When we’re frequently using a laptop, computer, or cell phone, it’s typical to not only have a forward- positioned head, but also a forward-rounded upper back. When this happens, spinal compression is increased, chest muscles are shortened (and likely tighter than normal), shoulders are not in proper alignment, lung capacity is diminished, and internal organs are compressed. Over time, these adjustments become part of normal posture, and can cause discomfort or pain.

Try this series for the shoulder, chest, and upper back:

IMG_1829.jpg

Shoulder rolls and circles - From a seated position, roll your shoulders upwards and in front of you, then downwards and backward, for 5-8 reps, then switch directions, rolling upwards and behind you, then downwards and forward, for another 5-8 reps. Shoulder circles can be performed by using your extended arms to create large circles, starting by moving in forwards circles, then backwards circles for 5-8 reps each.

IMG_1851.jpg

Foam roller angels - Using a foam roller placed behind your upper back and underneath your shoulder blades, practice using your arms to angle outwards and wide (like a goal post), to an extended position overhead, with hands reaching far away from the body, for 2-3 reps, then roll forward on the foam roller about 1 inch, so it’s placed a little higher on the upper back, and repeat 2-3 reps. Repeat the angels until the foam roller is high on the upper back. This practice keeps your thoracic spine mobile, stimulating the upper back muscles while encouraging a healthy range of motion in the pecs, lats, and shoulder girdle.

IMG_1878.jpg

Band pull-aparts - Grab onto a resistance band so that your hands are approximately shoulder-width apart, and pull apart the band while keeping a neutral hand position (thumbs up) and shoulders staying down (relax the upper traps, keeping the shoulders down). At the end of the movement, squeeze the shoulder blades together, activating the lower traps and rhomboids. These muscles are essential in maintaining proper posture. Practice for 15-20 reps. (Theraband has some simple long bands that work well for this exercise.)

IMG_1839.jpg

Wall slides - Stand in front of a wall, leaning into it, and start with arms extended overhead, reaching for the ceiling, with the tops of the hands touching the wall. Slowly retract the hands towards your body, bending at the elbows, and at the bottom of the movement, squeeze your shoulder blades together. Practice 8-10 reps. This exercise also activates your lower traps and rhomboids, encouraging good posture.

IMG_1855.jpg

Cow face pose with towel (upper body) - Using a towel, place one hand overhead, and one hand behind you, grabbing both ends of the towel. Moving mindfully and gently, see how far you can open up into the stretch and get the hands closer together. Hold for 10-20 seconds and switch sides.

IMG_1840.jpg

Cat cow pose (or cat camel) - From a tabletop position where the wrists are aligned under the shoulders, and the knees are aligned under the hips, start with a neutral spine or flat back position. Take a deep breath in as you arch the back and look up towards the ceiling. As you exhale, round the back as much as possible, looking down at your navel. Repeat for 5-8 reps.

IMG_1842.jpg

Extended puppy pose - From a tabletop position, walk the palms forward until you’ve reached as far as possible, while keeping the hips high. You might want to allow the head to drop, relaxing the forehead onto the floor or mat. This stretch alleviates lengthens the spine and opens the shoulders. Hold for 20 seconds, taking deep breaths.

IMG_1857.jpg

Side-lying thoracic rotations (“Hands on the clock”) - From a side- lying position with knees bent and hips stacked evenly, extend the arms and place the hands on top of each other. From this position, slowly rotate your top hand so that it opens upwards and behind you, as if your hand moves from the “9” to the “3” on a clock. This movement stretches the chest, back, and shoulders. Practice 5-8 reps, then switch sides.

About Custom Fit SF

Custom Fit SF is San Francisco’s premier personal training facility, with two studios totaling approximately 4,000 square feet. We’re located at 1844 Market Street. We have complimentary towels, a shower, lockers, air conditioning, great music, easy Muni access, street parking, and an incredible amount of natural light. We are never crowded and always clean. We have an arsenal of specialized equipment ready for your personalized program. Come check us out! Fill out the intake form here.

*Disclaimer: Not all exercises, stretches, self-massage techniques, tips, or maneuvers mentioned here are suitable for everyone. Before attempting anything new, take into account your flexibility, strength, and overall health to determine whether or not a particular recommendation is appropriate for you. If you are not able to determine the safety of a recommendation, do not do it without having cleared it first with your physician. This is particularly important if you are overweight, pregnant, nursing, taking regular medications, have injuries, have had a recent surgery, or have any existing medical or health conditions. The exercises and instructions included on this website are not a substitute for medical advice. As with any exercise program, if at any point during your exercise you begin to feel faint, dizzy, or have physical discomfort, you should stop immediately. You are responsible for exercising within your limits and seeking medical advice and attention as appropriate. Any injury sustained from proper or improper use of the exercises contained herein is solely the responsibility of the participating individual. Custom Fit SF, its trainers, coaches, staff, partners, and affiliates are not responsible for any injuries that result from participation in the recommendations shown.

Written By Christina Lim

Golden Healing Chicken Soup

It's true.  Grandma knew it all along.  Chicken soup is one of the most healing foods out there.  Cultures around the world have known this for centuries. It's truly the best food you can eat when you're sick, stressed, just had a baby or medical procedure, or simply to warm up and feel cozy on a cold or rainy night. 

Wouldn't it just be so nice to have this soul hug of a meal in your freezer, waiting for you when you come home from a long day, or just when you need to feel taken care of?

There are so many delicious variations of chicken soup to choose from, but this one is extra special for the following reasons:

  • Ease - Honestly meal prepping or making this cant get much easier. All you have to do is chop a few things and add to a freezer safe container (here & here are my faves), or add straight to the instant pot and then the work gets done for you while you prep your favorite toppings. And when it comes to making soup exciting, it's ALL ABOUT THE TOPPINGS.

This chicken soup is full of immune boosting, gut supportive nutrients, healthy fats, ample protein and antioxidant rich vegetables.

  • Health - Bone broth is a big reason why this soup is so nourishing. It's full of gut-healing amino acids, collagen, minerals and nutrients in their most bioavailable form. Its also easy to digest and extremely nourishing and supportive. Here you can find some great info on bone broth. I make my own in my Instant Pot and always stock my kitchen with great store bought brands as well. You can find many good pasture raised bone broths available online and at grocery stores. Some of my favorites are Bare Bones, Kettle & Fire and Epic.

golden healing chx soup ingredients.jpg

Let's not forget about taste - It HAS to be delicious for me to even consider eating it, feeding it to my family or recommending it. I love how this variation is totally different from the OG classic chicken soup (still great but I like variety). The brightness of the lime and fish sauce with the freshness of the basil and mint and the spice of the chilis just check all the boxes for me. I’m pretty confident it will for you too!

If you're looking for more freezer friendly meals, check out these absolutely killer Pickled Ginger Salmon Burgers, and our beloved Maple Dijon Beef Stew!

golden healing chicken soup with towel.jpg
Golden Healing Chicken Soup

Golden Healing Chicken Soup

Yield: 6
Author:
Prep time: 5 MinCook time: 45 MinTotal time: 50 Min
This bright and comforting chicken soup is packed with flavor and healing nutrients.

Ingredients

Freeze Together:
  • 2 tbsp coconut oil
  • 3 cloves garlic, minced
  • 2 shallots, thinly sliced
  • 2 celery stalks, chopped
  • 2 carrots, chopped
  • 1 ½ lbs boneless skinless chicken thighs or breasts
  • 1 ½ tsp salt
  • 1 tsp turmeric (optional)
  • Juice of 3 limes or about ¼ cup
Add to Instant Pot day-of
  • 6 cups chicken bone broth
  • 1 cup jasmine rice
  • 1 tbsp fish sauce or soy sauce or coconut aminos
Optional Garnishes
  • toasted crushed peanuts
  • 3 cups baby spinach
  • lime
  • fresh basil, mint and cilantro

Instructions

  1. From frozen, add all ingredients to the Instant Pot and cook on high pressure for 15 minutes.
  2. When the timer goes off, let the steam natural release for 10 minutes.
  3. Remove the chicken and shred/ cut into bite-sized pieces, set aside.
  4. With the broth and veggies still in the pot, set the Instant Pot to saute and add 1 cup of jasmine rice. Let rice cook for about 15 minutes or until done.
  5. Add chicken back to the pot, plus 1 tbsp of either fish sauce, soy sauce or coconut aminos. Stir to combine.
  6. Serve with toppings of choice. Here we added 3 cups of fresh baby spinach (wilted in the soup for 1-2 minutes), toasted crushed peanuts, pickled chili, and a generous amount of fresh basil, mint, and cilantro plus more lime.

Learning the Deadlift? Here are 6 Beginner-Friendly Variations to Try

Picking up a dead weight from the floor sounds simple enough, but the barbell deadlift is one of the most complex movements to master in the gym. Why? It’s a multi-joint movement requiring significant muscle recruitment, spinal stability, and joint mobility, and mastering this lift means that you’ve optimized force production by integrating movement efficiently between primary, secondary, and synergistic muscles throughout the body. It also means that as you progress with heavier weights, or switch from simpler to more complex variations, you are able to consistently perform with proper technique.

Challenging as it may sound, however, deadlifts can be executed safely and are practical for anyone at any skill level who wants to reap its many benefits (athleticism, strength, functional fitness for daily activities, high calorie-burn, core stability, glute and back development, and improved posture, to name a few). How? By starting with simpler setups and lower resistance levels. In this article, we’re going to cover 6 beginner-friendly variations of the deadlift. 


[1] The Block Deadlift

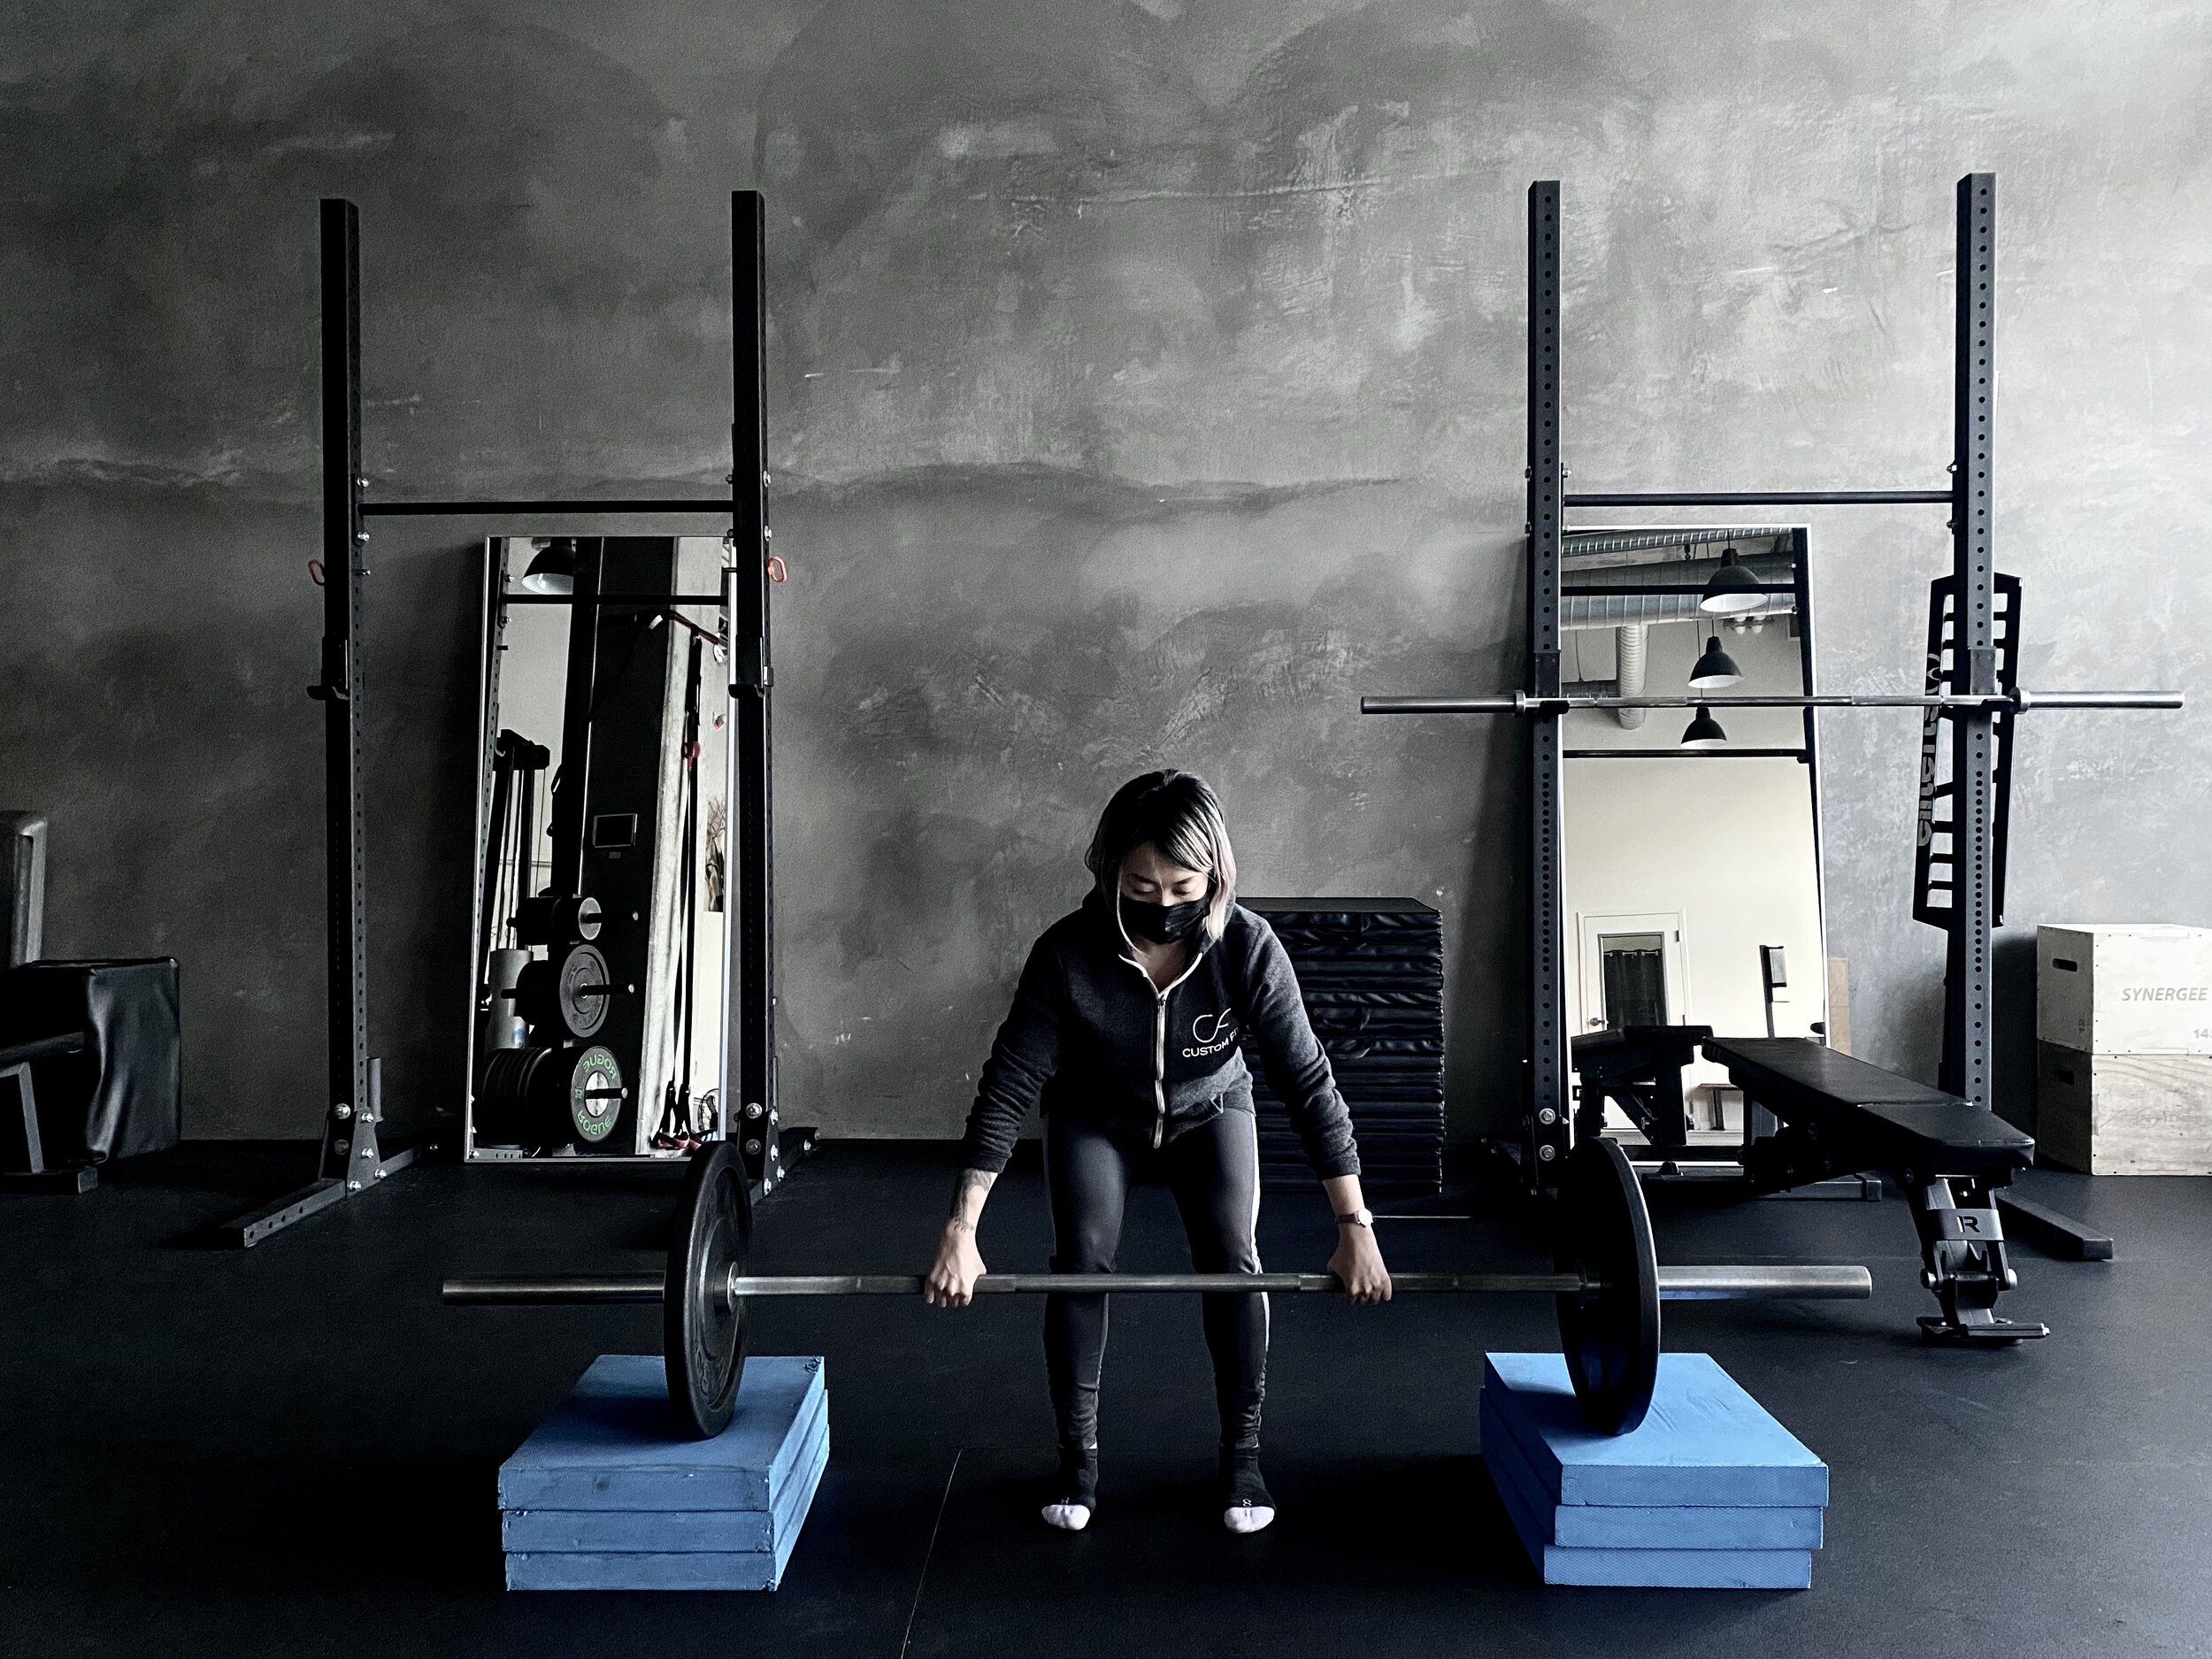
The Block Deadlift is a deadlift variation that shortens the range of motion (ROM) of a conventional deadlift for minimal low back stress and neural adaptation, allowing you to focus on the top portion of the lift while getting used to proper foot stance and holding full-body tension while developing hip flexibility, back stability, and back strength.

There are a few ways a block can be used in a deadlift setup. The easiest variation of the block deadlift is using a single weight (such as a kettlebell or dumbbell) placed on a riser, step, or yoga block, centered between the feet, so that the weight can travel along your midline - closest to your center of gravity. A progression of this exercise would be using a pair of weights stacked on blocks outside the feet. For a barbell variation, blocks can be set up under each plate stack. 

This deadlift variation can be programmed with a small amount of weight to start with and progress to more moderate amounts of weight. It can also be partnered with exercises that address any other limiting factors such as hip flexibility, ankle mobility, thoracic mobility, and core strength, before progressing onwards to a deadlift from off the floor. 


[2] The Single-Leg Deadlift, or Staggered-Stance “Kickstand” Deadlift

RDL.jpg

The Single-Leg Deadlift and Staggered-Stance “Kickstand” Deadlift, two slightly different variations of a single-leg deadlift, are not only great ways to improve your overall deadlifting strength, but also can be used to address any left or right-side imbalances or weaknesses and assist with unilateral (single-sided) neural adaptations that must take place to optimize muscle recruitment. This exercise emphasizes core coordination and strengthens the core sling system (shoulder to opposite hip). T

The conventional single-leg deadlift (variation with one leg lifting off the floor) requires core stability, balance, and proprioceptive control as the hip hinges with the torso descending forward to an almost-parallel position with the floor. It can be weighted with a free weight in a contraload position (load on the opposite side), ipsiload position (load on the same side), or bilaterally with two weights. A regression of this setup can allow one hand to use a wall or bench to assist with balance. Alternatively, the exercise may be performed by utilizing a weight with a fixed line of pull, such as a cable machine or a landmine setup, to make it easier to balance. The unique benefit of the single-leg deadlift is the deep stretch resulting from the extreme torso angle, which creates a larger range of motion (ROM).

Photo May 01, 7 45 21 PM.jpg

The Staggered-Stance or “Kickstand” Deadlift is a regressed single-leg deadlift where the back leg stays on the floor. This variation may be used as a prior to advancing to the aforementioned conventional single-leg deadlift. 

[3] The Banded Deadlift

band DL 2.jpg

The Banded Deadlift variation is a great way to challenge basic hip-hinge form. There are several ways to use bands in the deadlift and each setup has slightly different benefits. A common setup is having a band anchored to the floor (looped around the feet, or connected to hooks or dumbbells), in which the greatest tension lies at the upper part of the lift - where external torque and resistance is typically reduced (since the weight picks up velocity from the bottom part of the lift). The band can easily be used on its own or looped through a kettlebell or dumbbell.

Depending on the anchor points used, areas of tension can be changed. For example, a band that is anchored in front of you instead of below you or at your feet pulls you forward, encouraging shoulder extension and activation of the lats (latissimus dorsi), which are essential for maximizing power and strength in the deadlift. You may choose to experiment with variations of the banded deadlift to enhance activation, neural adaptation, and overall muscular recruitment throughout the lift. 

[4] The Sumo Deadlift

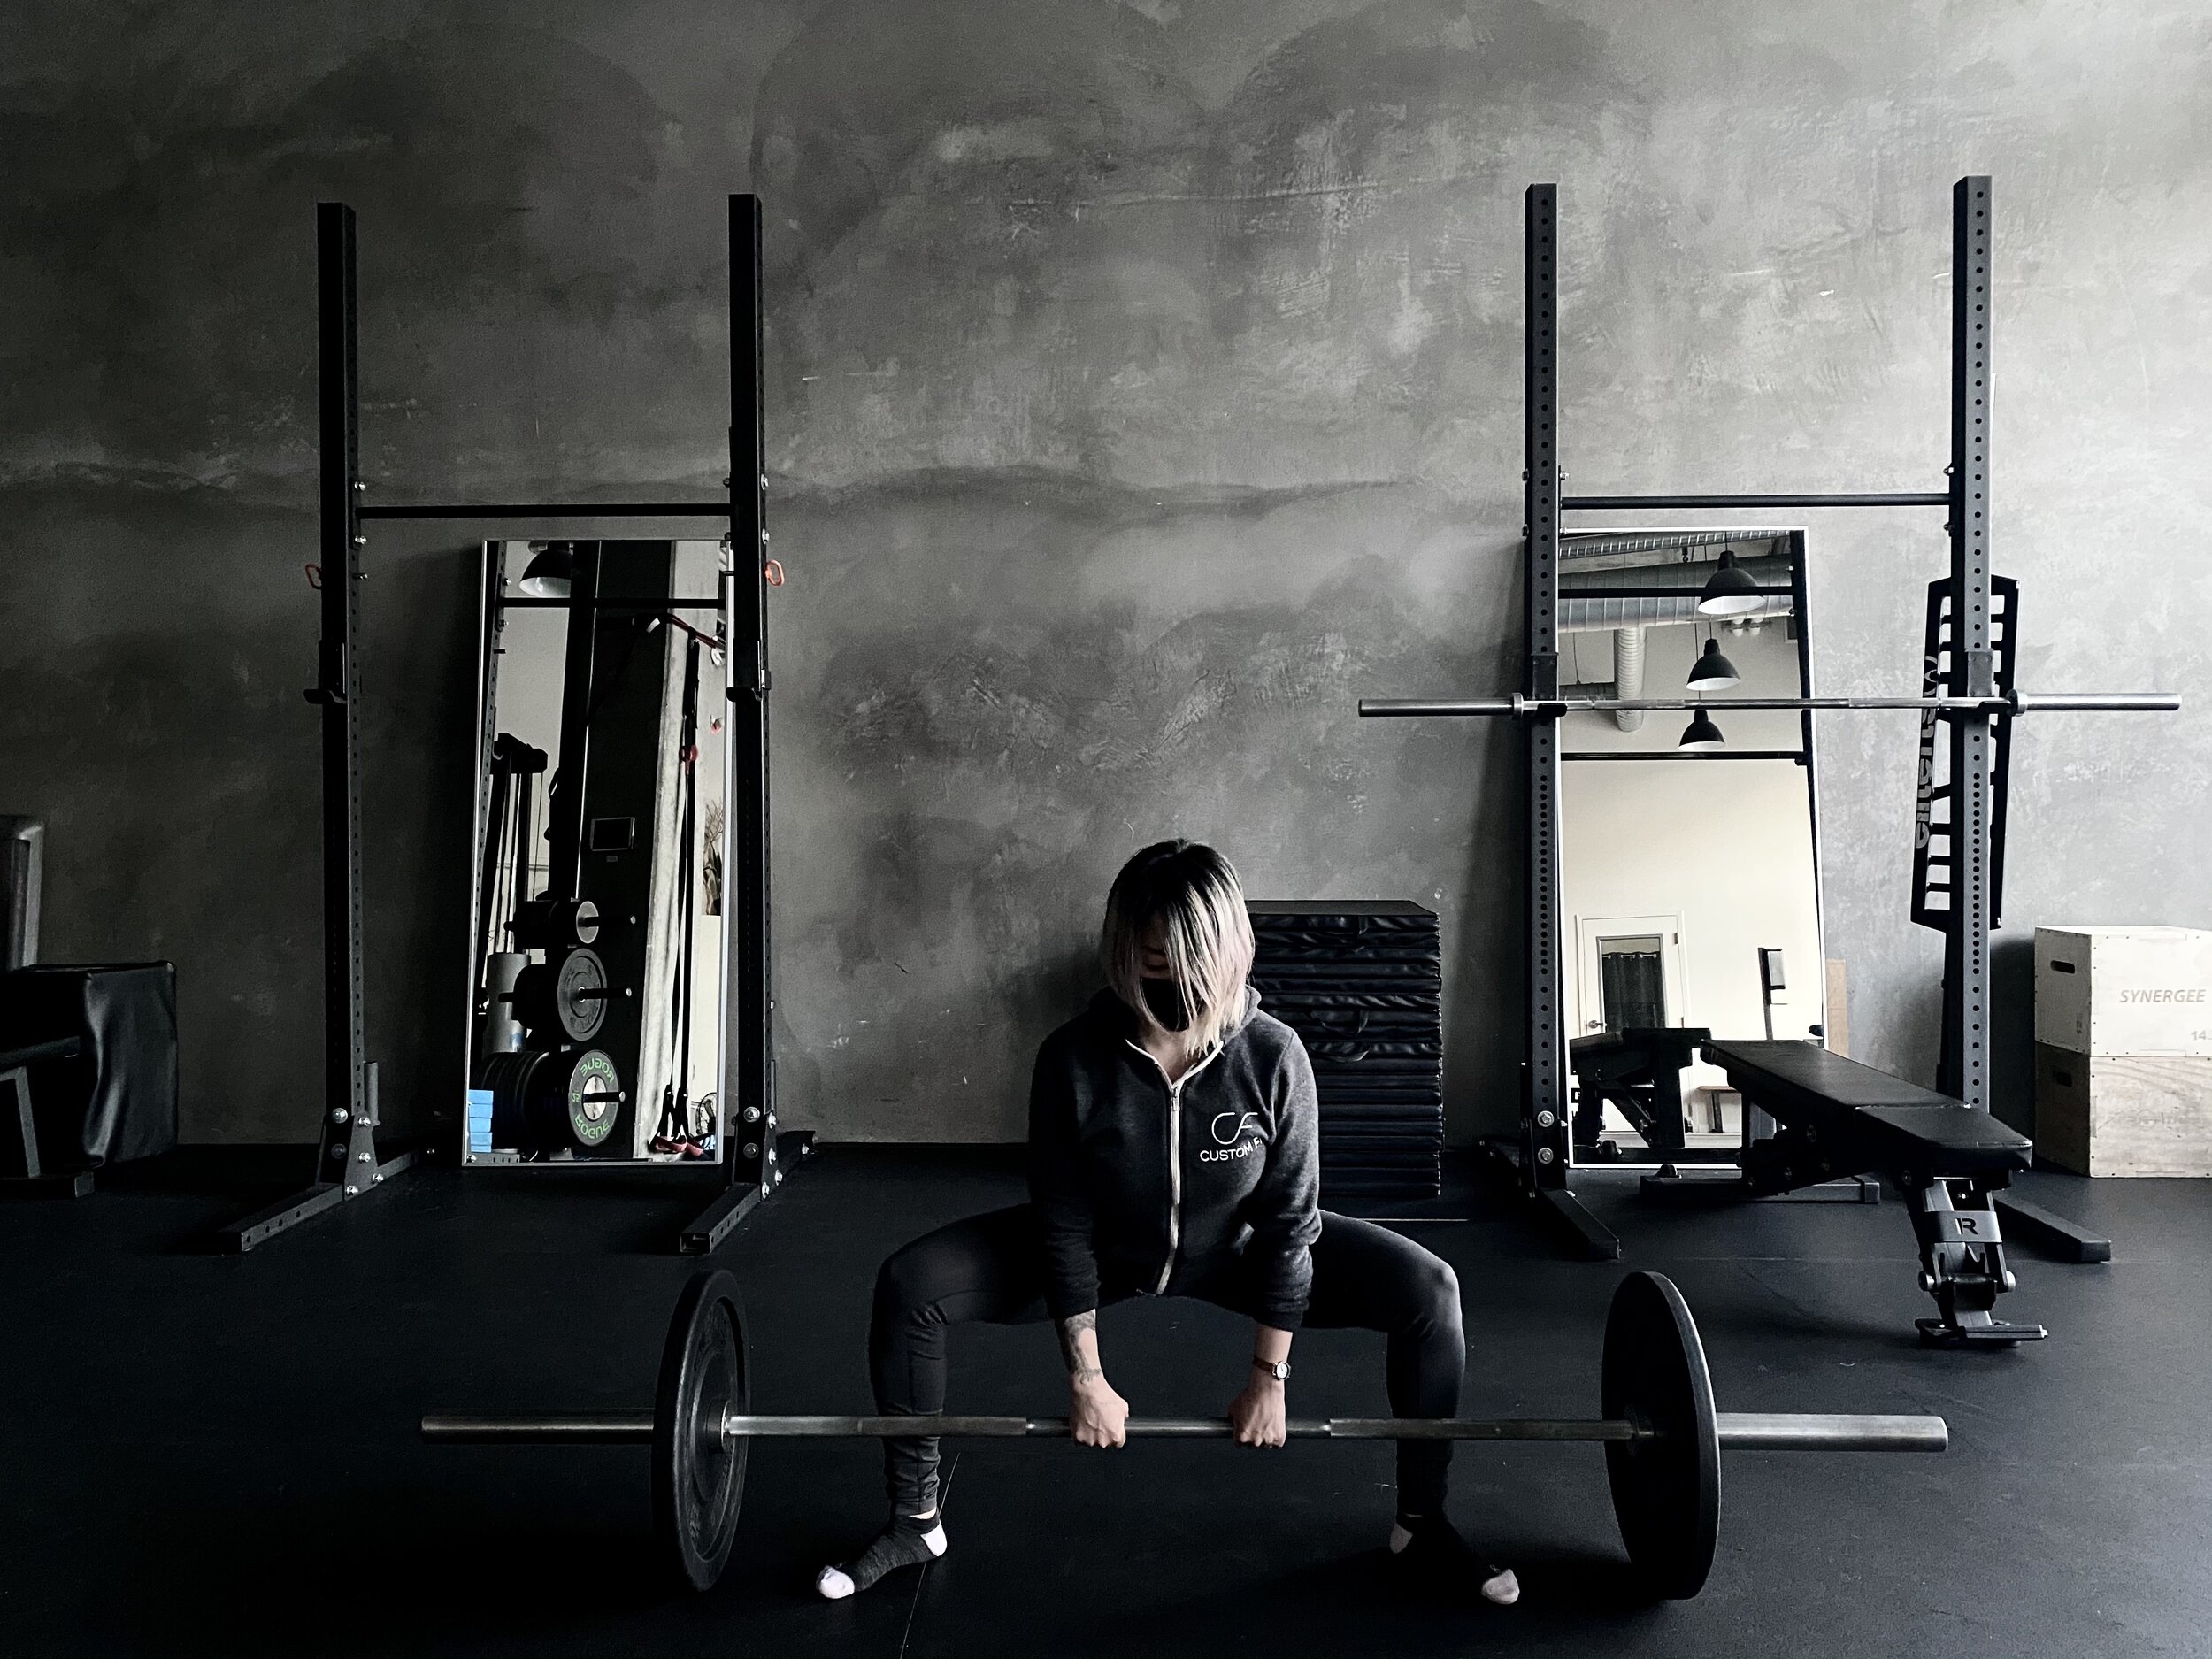
sumo DL.jpg

The Sumo Deadlift is a unique deadlift variation that uses greater hip external rotation and knee flexion, which engages more of the glute medius, quads (specifically, the vastus medialis and vastus lateralis), and the outside fibers of the calves (tibialis anterior). It also allows for a more upright back position, thus reducing the demand on the low back. Foot stance for this variation is wider than shoulder-width, with toes pointing outwards, allowing the shins to be positioned perpendicular to the floor. The back should be flat, with arms extending downwards between the knees to grasp the weight. In a barbell setup, the shoulders should be aligned above the bar. There is also evidence that shows that lifters with a longer torso relative to leg length may find this variation easier to perform. Due to the wider stance and narrow arm positioning, this deadlift variation shortens the range of motion (ROM), allowing use of heavier loads compared to the conventional deadlift. 

[5] The Pause Deadlift

pause DL.jpg

Manipulating tempo in a lift is yet another method of challenging technique and form. The Pause Deadlift, which typically requires a 2-second pause somewhere between the floor and the knees, allows you to address a particular sticking point (difficult part) in the lift by increasing time under tension (TUT). 

For example, if your sticking point is getting the weight off the floor, your 2-second pause could be just 1-inch off the floor. If it’s completing the lift at the lock-out position (at the top), your pause may be closer to the knees. The Pause Deadlift is commonly used to reinforce the bottom portion of the lift, engaging more of the muscles involved in knee extension - the quads.

For effective execution of the Pause Deadlift, be consistent with each rep, pausing at the same spot, and focus on moving out of the pause with an explosive effort, so the weight does not descend before ascending again. This variation can be used effectively in place of adding a heavier load.

[6] The Hex Bar Deadlift, aka The Trap Bar Deadlift

trap DL.jpg

The Hex Bar Deadlift, or the Trap Bar Deadlift, is a deadlift variation that incorporates a hexagonal-shaped specialty bar which the lifter steps inside of. This bar also features neutral-grip handles, and often comes with a higher and lower set of handles. Compared to a conventional deadlift, the Hex Bar Deadlift has a decreased range of motion (ROM), allows for a more upright torso position (less stress on the low back), and requires more knee flexion at the bottom portion of the lift (hence more quad-dominant), as is the case with the Sumo Deadlift. It still requires significant posterior chain muscular recruitment, but its demand on the low back and hamstrings is slightly diminished

Anecdotally, the Hex Bar Deadlift has allowed heavier loads compared to the conventional barbell deadlift. This may be because the hex bar allows the lifter’s center of mass to be aligned more closely to their joints, as Chris Beardsley comments

Thanks to the introduction of many modern types of gym equipment, as well as the ability to manipulate body position, tension, and tempo, the deadlift can be regressed for anyone at any skill level, and customized to address specific weaknesses or sticking points. As we wrote about in our previous post, the deadlift is a beneficial, functional exercise that works well for both sexes, building strength, muscle tone, and supporting weight loss (specifically, fat loss), and being “old”, “not knowing how to exercise”, or having recovered from a previous injury doesn’t preclude you from benefiting from this essential lift. Give these deadlift variations a try, and see how they improve your technique, mind-body connection, and confidence!

And if you’re still unsure how to go about learning the deadlift, it can be extremely beneficial to work with a coach or personal trainer. Here at Custom Fit SF, we can set you up with your own personal trainer, so you not only have someone teaching it to you one-on-one, with the ideal set up for you, but also a second set of eyes checking your form as you practice - and master - this amazing lift! Whether you’re looking to lose weight, lose body fat, get strong, fit, increase core strength, or put on some muscle (maybe you want that v-taper? or a 🍑 peach-butt?), a trainer can guide you through a customized program that incorporates these important movements. Hit us up and we’ll be happy to help you along your fitness journey!

About Custom Fit SF

Custom Fit SF is San Francisco’s premier personal training facility, with two studios totaling approximately 4,000 square feet. We’re located at 1844 Market Street. We have complimentary towels, a shower, lockers, air conditioning, great music, easy Muni access, street parking, and an incredible amount of natural light. We are never crowded and always clean. We have an arsenal of specialized equipment ready for your personalized program. Come check us out! Fill out the intake form here

Written By: Christina Lim